
Last Updated: October 25, 2026
Quick Summary
A functional laundry room layout starts with accurate measurements of your space, then positions appliances in a logical workflow sequence with proper clearances: dirty laundry enters near the washer, moves to the dryer, then to a folding station, and finally to storage or hanging areas. Plan appliance placement around fixed utilities like plumbing and electrical outlets, ensure an aisle of at least 900 mm for movement, and incorporate storage and work surfaces that match your household’s needs.
- Measure room dimensions, ceiling height, door swing, plumbing, outlets, and vents before designing anything
- Maintain a minimum 900 mm aisle in front of appliances and 50-75 mm rear clearance for hoses and vents
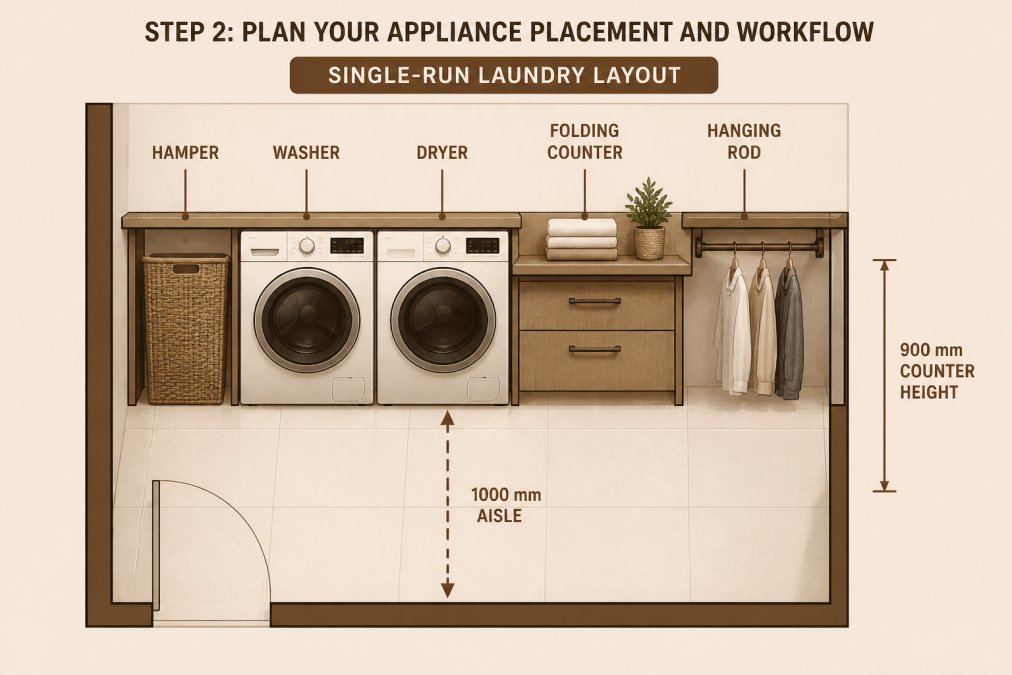
- Arrange workflow in a single sequence: hamper, washer, dryer, folding counter, then storage or hanging
- Use vertical storage, wall-mounted shelving, and corner units to maximise space in small laundry rooms
- Plan dryer venting to exhaust outside and ensure a dedicated electrical circuit for the dryer
Table of Contents
- Step 1: Measure Your Space and Understand Your Constraints
- Step 2: Plan Your Appliance Placement and Workflow
- Step 3: Design Small Laundry Layout Ideas That Maximise Space
- Step 4: Incorporate Laundry Room Storage Ideas for Organisation
- Step 5: Add Work Surfaces and Folding Stations
- Step 6: Plan Utilities, Ventilation, and Safety
- Create Your Laundry Renovation Planning Checklist Before You Start
- Getting Your Design Built: Working with a Professional Designer
- Frequently Asked Questions
Step 1: Measure Your Space and Understand Your Constraints
Before designing anything, measure your laundry room accurately: width, length, ceiling height, and the position of doors, windows, plumbing, outlets and vents.
At WDC Services, we start every laundry renovation with precise measurements to prevent costly installation mistakes.
Sketch your room dimensions on paper or in a basic floor plan app, in centimetres. This becomes the foundation for the functional laundry room layout.
| Measurement | What to Record | Why It Matters |
|---|---|---|
| Room width and length | Overall space dimensions | Determines appliance placement options |
| Ceiling height | Vertical clearance | Affects stacking options and ventilation |
| Door swing | Which way doors open | Ensures clearance for movement |
| Existing plumbing | Water inlet and drain locations | Limits washer position |
| Electrical outlets | Current outlet locations | Determines dryer placement |
| Windows and vents | Natural light and air sources | Affects ventilation planning |
Step 2: Plan Your Appliance Placement and Workflow
Your workflow determines how you move through the space. Efficient layouts follow a logical sequence with no backtracking: dirty laundry enters near the washer, moves to the dryer, then the folding station, then storage or hanging areas.
Dimensioned clearances that actually work
Generic advice to “leave enough room” is useless when you are standing in a 1.8 m × 2.4 m room with a tape measure. Use these working clearances as a starting point, then confirm against your appliance manufacturer’s installation instructions, which override any general guide.
| Element | Minimum clearance | Comfortable clearance | Why it matters |
|---|---|---|---|
| Aisle in front of appliances | 900 mm | 1000-1100 mm | Allows doors to open and a person to pass with a basket |
| Washer/dryer side gap | 20 mm each side | 50 mm each side | Vibration, hose access, and ventilation |
| Rear gap for hoses and vent | 50-75 mm | 100 mm | Prevents hoses kinking and dryer vent crushing |
| Folding counter height | 850-900 mm | 900 mm | Waist height for most adults; reduces back strain |
| Folding counter depth | 500 mm | 600 mm | Fits a folded towel stack and a basket |
| Wall cabinet above counter | 450-500 mm above counter | 500 mm | Reaches without a step stool for most users |
| Door swing clearance | Door width + 100 mm | Door width + 200 mm | Prevents door hitting appliances or a person |
If your room cannot meet the minimum aisle, a stacked configuration or a sliding/bifold door is usually the fix. A 900 mm aisle is the practical floor for a functional layout; below that, the room becomes a corridor you shuffle through sideways.
Map the workflow with a simple sequence
Draw the room to scale on graph paper (1 square = 100 mm) or in a free floor-plan app. Mark fixed elements first, door, window, plumbing, outlets, dryer vent, then place appliances and draw arrows showing how clothes move.
If you must use two walls, keep the washer and dryer on the same wall and put the folding surface opposite or adjacent, never behind a door swing. A person carrying a basket should never have to turn around or step over anything.
Ergonomic placement
Front-loading washers are more ergonomic than top-loaders because they reduce bending and free up space above for storage or a work surface. On a plinth or pedestal, keep the drum opening roughly 400-900 mm from the floor.
Consider who uses the laundry room. Families with young children need lower storage for detergents, but keep hazardous chemicals high or locked away. Households with mobility concerns benefit from front-loading appliances at waist height and a clear 1000 mm turning circle.
Before you commit, do a “dry run” with empty baskets: walk the route from where dirty laundry is generated to the hamper, then through each stage. If you have to open a door, step around a bin, or reach over an appliance, adjust the plan now, it is far cheaper than moving plumbing later.
Step 3: Design Small Laundry Layout Ideas That Maximise Space
Small laundry rooms demand smart thinking. Vertical storage is your best friend.
Corner spaces often go unused. A corner shelf unit or carousel storage makes use of dead zones.
Folding stations don’t need much room. A hinged wall-mounted table folds down when needed and disappears when not.
Doors can work against you in tight rooms. Sliding doors take up less swing space than hinged ones.
Good lighting makes a compact room feel bigger and safer. Recessed ceiling lights don’t take up headroom like pendants do.
Step 4: Incorporate Laundry Room Storage Ideas for Organisation
Storage transforms a chaotic laundry room into a functional space. Open shelving keeps supplies visible and accessible.
Vertical storage maximises every inch. Wall-mounted cabinets go higher than freestanding ones.
Sorting stations keep dirty clothes organised before washing.
Hanging rods store clothes that air-dry. A tension rod between two walls costs almost nothing.
Drawers under the folding station store socks, delicates, and small items.
For detailed storage solutions tailored to your space, explore small laundry room storage design ideas for 2026.
Step 5: Add Work Surfaces and Folding Stations
A folding station transforms laundry day.
Folding counters can be permanent or temporary. A fixed countertop mounted above the washer and dryer provides a dedicated work area.
A pull-out shelf between appliances works for folding small items or sorting clothes before washing.
Clothes steamers and pressing tools need their own hooks or shelves, kept organised and visible to save time.
The work surface material matters. Laminate is budget-friendly and easy to clean. Solid surface materials resist stains and heat.
For guidance on adding countertops to your laundry room, check our resource on how to add a countertop to your laundry room.
Step 6: Plan Utilities, Ventilation, and Safety
Utilities and ventilation are where laundry layouts fail quietly. A beautiful layout with a crushed dryer vent or an overloaded circuit will cause problems within months. Plan these before you finalise appliance positions.
Dryer venting and moisture control
A dryer vent should exhaust outside, not into the room. Flexible foil or plastic ducting crushes easily behind appliances; semi-rigid or rigid metal ducting with as few bends as possible keeps airflow up and lint down.
Condenser and heat-pump dryers need no external venting but release some moisture and heat into the room.
Moisture-resistant materials protect your investment: semi-gloss paint resists humidity better than flat, waterproof cabinetry coatings withstand damp, and tile or vinyl flooring resists water damage better than wood or laminate.
Electrical safety
Your dryer needs a dedicated circuit, multiple appliances on one circuit risk overload and fire. Have a licensed electrician check your setup before finalising the layout; this is not a DIY task.
Keep power outlets away from water sources. Place them above bench height and to one side of the washer, not directly behind it, so the plug is reachable without pulling the appliance out. When renovating, ask the electrician for extra outlets for an iron, steamer and phone charger.
Plumbing placement
Washers need hot and cold water inlets plus a drain. Moving plumbing costs money and usually requires a licensed plumber, so work with existing plumbing where possible. If you must move the washer, keep it on the same wall as the existing supply and drain, usually the cheapest change. Check the standpipe or drain can handle the washer’s discharge rate.
Lighting and temperature
Lighting should be bright and practical. Recessed or flush-mount fixtures work well; avoid pendants that collect dust and moisture. Aim for even light over the folding counter and appliance controls, and consider a task light under the overhead cabinets.
Temperature control matters. Ensure your HVAC reaches the laundry, or plan for a small exhaust fan and a door that can be left ajar, poor air circulation creates musty smells and promotes mould.
Never block the dryer vent, and never run a dryer without a lint filter. Lint is highly flammable, and a blocked vent is a common cause of dryer fires. Clean the filter after every load and have the duct inspected periodically.
For comprehensive information on ventilation requirements, read why laundry room ventilation requirements matter. This explains the standards that keep your space safe and functional.
Create Your Laundry Renovation Planning Checklist Before You Start
A checklist keeps your renovation on track. Use this before you hire anyone or buy materials.
- Measure your space accurately in centimetres
- Identify existing plumbing and electrical locations
- Decide between side-by-side or stacked appliances
- Choose your folding station style and location
- Plan storage solutions for supplies and clean clothes
- Identify ventilation needs and dryer vent location
- Select moisture-resistant materials for walls and flooring
- Plan lighting layout for adequate brightness
- Check electrical capacity for your appliances
- Create a rough floor plan showing appliance placement
- Set your budget and prioritise features
- Research contractors if you need professional help
This checklist helps you think through every aspect of your functional laundry room layout before construction begins.
For a deeper dive into renovation planning, see our laundry renovation quote guide covering costs, timeline and planning. It walks you through the full process from initial concept to completion.
Getting Your Design Built: Working with a Professional Designer
A good designer listens: they ask about household size, laundry frequency and storage requirements, then design around your workflow.
Design professionals coordinate with tradespeople. Electricians, plumbers, carpenters, and tilers all need clear direction.
WDC Services handles laundry room design from start to finish.
Ready to transform your laundry room? Get a laundry design service consultation to discuss your project with our team.
Designing a functional laundry room layout requires careful planning and attention to detail.
Disclaimer
Contact Domenico (Dom) Crupi on 0425801005 or email info@wdcservices.com.au for further information.
Frequently Asked Questions
What is the ideal space needed for a functional laundry room layout?
A functional laundry room layout typically requires a minimum of 2 metres by 2.5 metres to comfortably fit a washer, dryer, folding surface, and storage. Smaller spaces demand creative solutions like stacked appliances and vertical storage. Your specific needs depend on household size, whether you sort laundry at source, and how much storage you require for supplies and finished items. Professional designers can optimise even tight spaces by planning workflow carefully.
How should I arrange my washer and dryer in a laundry room layout?
Side-by-side placement works well if you have the width and prefer easy access to both appliances. Stacked configurations save floor space in smaller rooms. Position them near plumbing and electrical outlets to reduce installation costs. Ensure adequate clearance in front for loading and unloading, and leave space for a work surface nearby. The best arrangement matches your household workflow and available room dimensions.
What storage solutions work best for small laundry layout ideas?
Vertical storage maximises small spaces: wall-mounted shelving, tall cabinetry, and overhead racks keep supplies accessible without consuming floor area. Drawer organisers, pull-out baskets, and labelled containers improve efficiency. Consider a laundry hamper that sorts dirty clothes by colour or fabric type. Corner shelving and under-sink storage utilise dead zones. Multipurpose furniture, such as a folding counter with storage below, combines function and organisation in tight quarters.
Why is workflow important when designing a laundry room layout?
A logical laundry workflow layout reduces time and effort by arranging stations in order: sorting, washing, drying, folding, and storage. Positioning the dirty-clothes hamper near the washer, the dryer close by, and a folding surface adjacent to storage creates a natural movement pattern. This design minimises backtracking, reduces strain, and makes the space more enjoyable to use. Families benefit most from workflows tailored to their routines and habits.

Disclaimer: Disclaimer, Please note this advertisement has been AI generated for entertainment and leed generation purposes and In some cases may not reflect the companies exact services and information. Prior to engaging the company it is recommended that you seek clarification on some or all points in this advertisement. WDC Services has many 5 star google reviews that can be used as a reliable and true testimony to the quality services proved to its customers over many years. Contact Domenico ( Dom ) Crupi on 0425801005 or email info@wdcservices .com.au for further information.