
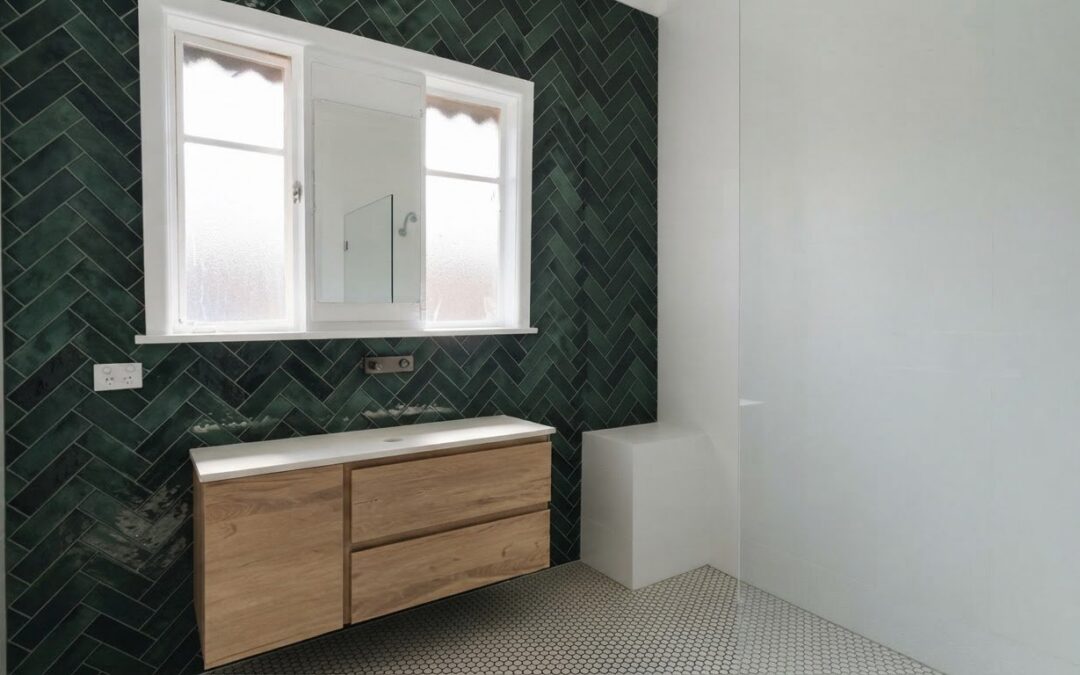
A small bathroom doesn’t have to play it safe with tile. Large-format tiles of 600×600 mm or larger are recommended for small bathrooms, while custom bathroom tiling patterns can add detail through a considered layout, a subway-tile arrangement or black-and-white mosaics. The key is choosing a pattern that suits the room rather than competing with it.
It’s understandable to worry that a bold pattern could make a compact bathroom feel busy. With a clear layout and restrained palette, custom bathroom tiling patterns can give the room a deliberate, cohesive look. This guide explains how to preview a layout before installation, compare subway patterns and use black-and-white mosaics with purpose.
You’ll also find practical ideas for making a small bathroom feel considered, from placing a feature pattern to choosing grout that suits the finished look. Whether you prefer a quiet, tonal finish or crisp contrast, these options can help tailor the bathroom to your space.
Key Takeaways
- Dry-lay tiles to assess the layout, colour variation and how a pattern will repeat before installation.
- Choose a subway-tile arrangement, such as herringbone or basketweave, to bring structure and character to a bathroom.
- Consider tile scale, colour and natural light together when planning a small space.
- Use black-and-white mosaics to introduce contrast, while keeping the overall design balanced.
- Explore how different tile shapes and layouts can create a tailored look for an Australian bathroom.
1. Dry laying tiles to preview layout, colour variation and pattern repeats
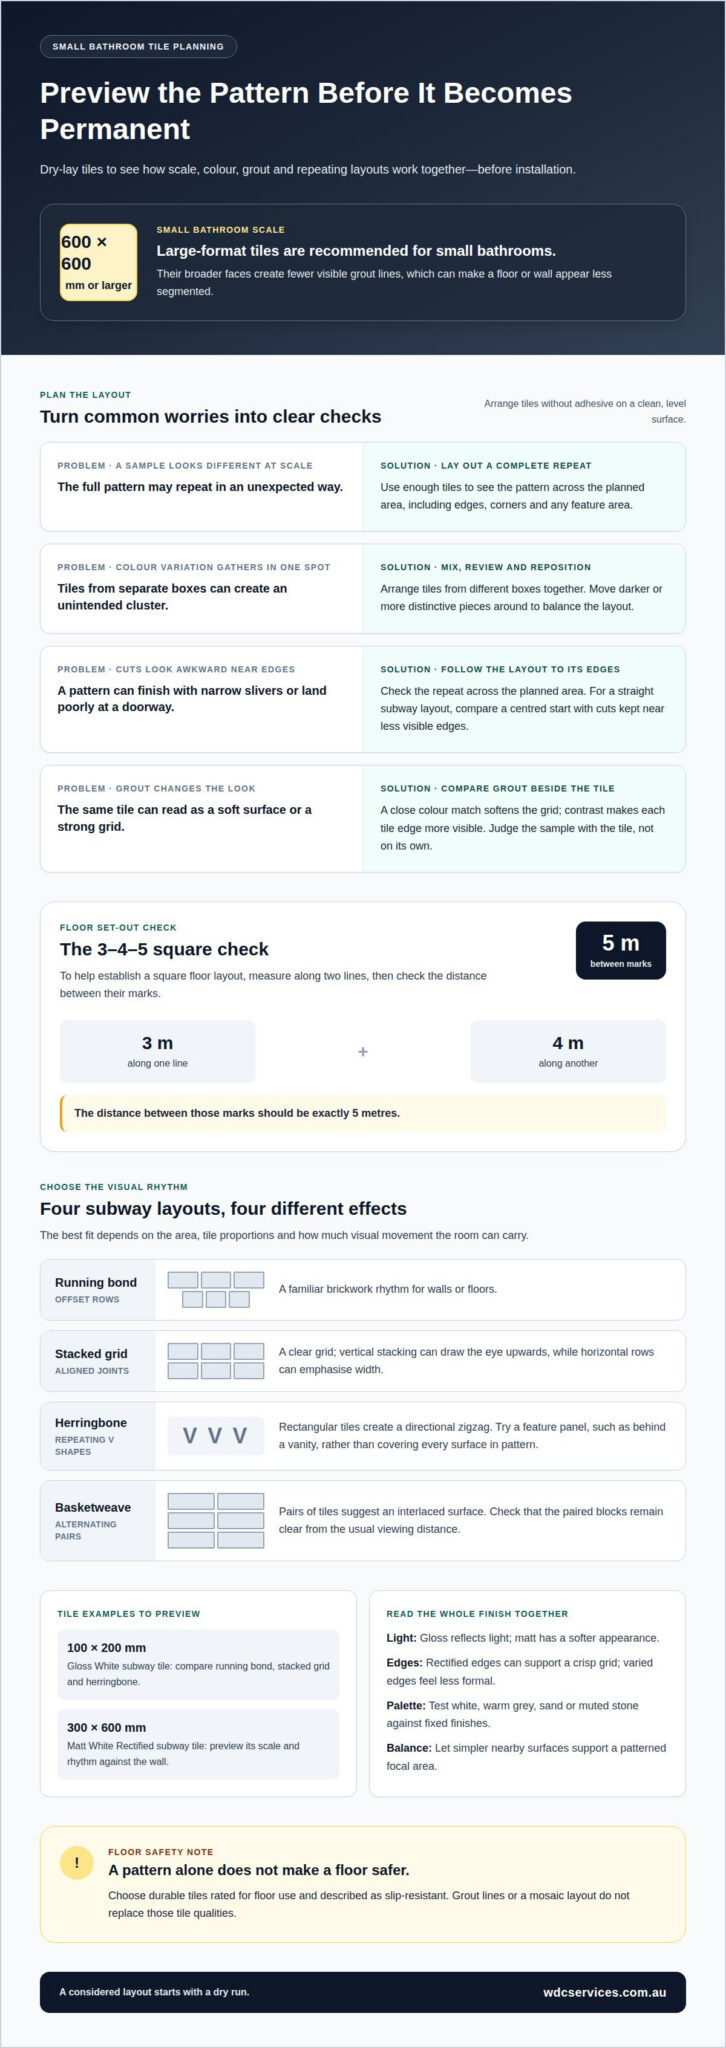
Dry laying means arranging tiles without adhesive to preview the layout. It shows how colour variation, tile size and pattern repeats work across the bathroom. A white subway tile, for example, may look uniform in a small sample but create strong horizontal lines across a full wall. Lay out enough tiles to see a complete repeat, including edges, corners and any feature area. This gives a clearer picture before installation.
Start with a clean, level surface and arrange tiles in the intended direction. For a herringbone design, position several rows so you can see how the diagonal lines meet the wall and turn at corners. For a straight subway layout, compare a centred starting point with one that keeps cuts near less visible edges. A 3-4-5 check can help establish a square floor layout: measure 3 metres along one line and 4 metres along another, then check that the distance between those marks is exactly 5 metres.
- Set out the tile size. Place tiles in their intended orientation, including the planned grout gaps, so the layout reflects the finished surface.
- Check colour variation. Arrange tiles from different boxes together. Move darker or more distinctive pieces around to avoid an unintended cluster.
- Follow the repeat. Continue the pattern across the planned area. Look for awkward slivers at edges or a repeat that lands poorly around a doorway.
- Review the grout colour. Place a grout sample beside the dry layout. A close match softens the grid, while contrast makes each tile edge more visible.
Subway tiles suit several layouts and colour schemes. A 100 by 200 millimetre Gloss White subway tile can be dry laid in a running bond, stacked grid or herringbone arrangement. The same tile colour can feel quieter in a straight grid than in a diagonal pattern. A larger 300 by 600 millimetre Matt White Rectified subway tile creates a different rhythm, so preview its scale against the wall before deciding.
For a timeless palette, test white, warm grey, sand and muted stone colours against the bathroom’s fixed finishes. Natural, earthy tones can connect the tile scheme with timber cabinetry or stone-look surfaces. A coloured grout sample can add definition, but compare it beside the tile rather than on its own. The tile, grout and tapware should read as one considered combination.
Which bathroom tile patterns are safest and most slip-resistant for floors? No pattern alone makes a floor safer. Choose durable tiles rated for floor use and described as slip-resistant. Grout lines or a mosaic layout do not replace those tile qualities.
2. Subway tile layouts, including herringbone and basketweave
Subway tiles create different effects depending on their orientation and repeat. A running bond offsets each row for a familiar brickwork rhythm, while a stacked layout aligns grout lines in a clear grid. Herringbone arranges rectangular tiles in repeating V shapes. Basketweave groups pairs of tiles to suggest an interlaced surface. The best fit depends on the area, tile proportions and how much visual movement the room can carry.
On a feature wall, vertical stacking draws the eye upwards, while horizontal rows can emphasise its width. A herringbone panel behind a vanity adds direction without covering every surface in pattern. Basketweave works best when its paired blocks remain clear from the usual viewing distance. Before choosing a design, consider where the pattern starts and ends around corners, niches and fittings. A layout that meets these edges cleanly looks more deliberate than one with narrow, awkward cuts.
Finish affects how a subway pattern reads. Gloss tiles reflect light and make grout lines more noticeable; a matt finish gives the surface a softer appearance. Rectified edges can support a crisp grid, while more varied edges give the pattern a less formal character. Consider the tile, grout and finish together. Dark grout outlines each tile, while a closer colour match reduces contrast and lets the overall layout take focus.
Patterned layouts also need a sound plan for movement joints, especially across external tiled pavements. Movement joints can help accommodate movement in tiled work and should be considered in the layout. For external tiled pavements, intermediate stress-relieving joints are recommended at centres of approximately 4.5 metres. The layout should account for these joints rather than treating them as interruptions to hide. Aligning a joint with a natural change in the paving can help the finished pattern read coherently.
- Running bond: Choose this versatile layout for a familiar, orderly rhythm across walls or floors.
- Vertical stack: Use aligned vertical joints to create a strong, upright emphasis.
- Herringbone: Set rectangular tiles in a repeating zigzag for a more directional feature.
- Basketweave: Arrange pairs of tiles in alternating directions for an interlaced effect.
For a coordinated bathroom, use one patterned area as the focal point and let nearby surfaces support it. Pair a herringbone vanity wall with simpler floor tiles, for example, or repeat a straight subway layout around a niche. This balance keeps the pattern intentional and helps the finishes work together.
3. What Are the Best Bathroom Tile Ideas for Small Bathrooms?
For a compact bathroom, choose tile scale and colour with the room’s light and proportions in mind. Tiles measuring 600×600 mm or larger are recommended for small bathrooms. Their broader faces create fewer visible grout lines, which can make the floor or wall appear less segmented. That look depends on the room’s shape, so consider where edges, doorways and fixtures interrupt the tiled surface.
Natural light can change how tile colour appears throughout the day. In a bathroom with a small window, pale wall tiles can help reflect available light, while warm white or soft stone shades avoid a stark effect. In a brighter room, a deeper floor tile or coloured feature behind the vanity can add definition. Keep the feature contained and let surrounding wall tiles support it rather than compete.
Choose tile size and shape to suit the bathroom’s proportions. A large rectangular tile can create a calm, continuous field on a broad wall, while a mosaic can follow the curves or edges of a shower niche. Small-format tiles introduce more grout lines and visual detail. Use them selectively, such as in one niche or on a vanity splashback, rather than covering every surface with competing patterns.
Mixing sizes, shapes and textures works best when each choice has a clear role. Pair smooth rectangular wall tiles with a smaller-format floor tile, for example, then repeat one colour across both surfaces. A textured feature tile can add depth, while simpler surrounding finishes keep the room visually organised. Compare the choices beside the vanity, shower fittings and cabinetry to see whether the palette feels cohesive.
Calculate tile quantities from measured wall and floor areas, accounting for doors, windows and fixed fittings. Allow spare tiles for cuts and future repairs. The amount needed depends on the tile shape, layout and number of edges; a diagonal pattern, for example, creates more offcuts than a straightforward grid. Where possible, keep spare pieces from the same tile batch so later replacements are more likely to match the installed colour and finish.
Are there Australian building or waterproofing rules for bathroom tiling? Yes. Plan bathroom tiling alongside applicable building and waterproofing requirements. Tiles and grout are not a substitute for waterproofing, so the layout must work with the waterproofed areas and their details.
How much does custom bathroom tiling cost per square metre in Australia? The cost depends on tile material, size, pattern complexity, surface preparation and cutting. A project price is provided after a quote request. A square-metre rate alone may not reflect the extra work involved in mosaics, angled layouts or detailed edges.
4. Black-and-white mosaic patterns
Black-and-white mosaics bring strong contrast to a bathroom without relying on several colours. A small checkerboard floor creates a clear repeating pattern, while white field tiles keep nearby walls visually quieter. In a compact room, use contrast deliberately: one defined feature can anchor the scheme, while repeated black details connect it with tapware, a mirror frame or cabinetry handles.
Pattern shape changes the mood. A hexagonal mosaic creates a compact honeycomb effect; penny-round pieces give the surface a softer, more playful rhythm. Checkerboard squares feel graphic and orderly, especially when their edges align with the room. Before choosing a pattern, consider its scale beside the vanity and shower screen. Very small pieces create more visible joints, while larger shapes make each motif easier to read from the doorway.
Decide where the pattern should lead the eye. A floor mosaic can define the central walking area, with plain wall tiles keeping the room from feeling crowded. Alternatively, a black-and-white mosaic behind a vanity can act as a feature, balanced by a simpler floor. A horizontal border draws attention across a wall; a vertical strip can frame a niche or mark the shower area. Keep the direction consistent where adjoining surfaces meet.
Grout is part of the design, not just a background detail. White grout between black-and-white pieces can soften the contrast, while dark grout makes pattern boundaries more pronounced. A small checkerboard with contrasting grout, for example, may create several layers of visual lines. Compare grout samples with the actual mosaic, then view them beside the bathroom’s other finishes. The right combination should clarify the pattern rather than obscure its shape.
- Checkerboard: Use alternating squares for a crisp, balanced floor or feature panel.
- Hexagonal mosaic: Choose repeating honeycomb shapes for a geometric surface.
- Penny-round mosaic: Use circular pieces to soften the strong contrast of black and white.
- Border detail: Add a horizontal band or framed niche instead of covering every wall.
For a coordinated floor and wall scheme, repeat one colour from the mosaic elsewhere. Black floor details might echo a dark tap, while white wall tiles preserve a lighter backdrop. Limit competing patterns: a bold checkerboard works best beside simpler surfaces rather than another high-contrast motif. This gives the mosaic a clear role and helps the bathroom feel composed.
A mosaic pattern does not determine whether a tile is suitable for a shower floor. Choose floor tiles rated for floor use and described as slip-resistant; the pattern itself cannot replace those qualities. Assess a black-and-white mosaic for its suitability as well as its visual effect, particularly where the shower floor meets the surrounding layout.
5. What are popular custom bathroom tile patterns in Australia?
Australian bathrooms can combine familiar tile layouts with distinctive shapes, colour and texture. Subway tiles remain a versatile choice for a running bond, stacked grid or vertical arrangement. A 100 by 200 millimetre format gives a classic rectangular proportion, while a 300 by 600 millimetre tile creates broader lines. The right choice depends on the room’s surfaces and the visual rhythm you want.
Herringbone brings movement to rectangular tiles through repeated angled lines. It can define a vanity wall or shower niche without making every surface compete for attention. Basketweave creates a more structured effect by pairing tiles in alternating directions. For either pattern, plan how the design meets corners, fittings and edges. A well-positioned starting point helps keep the pattern balanced across the visible area.
Small-format shapes provide another way to introduce detail. Finger-format tiles measuring 20 by 145 millimetres create narrow vertical or horizontal bands. Square tiles, such as a 200 by 200 millimetre format, can form a clean grid or a checkerboard effect. Rather than mixing every shape in one room, select a main pattern and use a second format only where it supports the overall scheme.
Black-and-white mosaics create a graphic focal point, while earthy shades offer a quieter, natural feel. A geometric mosaic can sit behind a vanity, for example, with plain tiles across the remaining walls. Alternatively, warm stone colours can carry through floor and wall tiles, with a contrasting niche adding definition. Connect the palette through a repeated tone or finish.
Grout also changes the appearance of a pattern. Tonal grout is described as the standard approach in 2026, giving tile surfaces a more continuous look. A contrasting grout makes the tile grid more pronounced, which can suit a checkerboard or stacked layout. Compare the tile and grout together under the bathroom’s lighting, since natural and artificial light can change how their colours read.
For a considered result, choose the pattern, tile format and grout colour as one design decision. Think about how the layout moves from the main floor to the shower and wall surfaces. A compact feature area can carry a bolder motif, while simpler surrounding tiles preserve visual balance. These choices make custom bathroom tiling patterns feel tailored rather than selected one surface at a time.
Planning a bathroom around a specific tile pattern? Discuss your bathroom renovation plans and how the layout, tile format and finish can work together.
WDC Services: Bathroom Renovations
WDC Services brings bathroom planning, material selection, construction and installation together in a comprehensive renovation. The team focuses on quality workmanship and finishes, with clear communication, punctuality and updates that keep you informed as the project progresses. Previous clients have highly recommended WDC Services for its professional approach and attention to detail.
For a bathroom renovation in Melbourne’s inner eastern suburbs, contact Dominic (Dom) Crupi to discuss your plans. Call Dom on 0425801004 or email info@wdcservices.com.au.
Shape a bathroom that feels like yours
Choosing custom bathroom tiling patterns is an opportunity to shape how a compact room feels and functions. Before settling on a scheme, consider the atmosphere you want each morning: calm, bright, graphic or grounded in natural tones. Let that intention guide your choices so the finished room feels coherent rather than assembled from separate details.
A renovation also lets you coordinate finishes with your household’s practical needs. Consider how you use the room, what needs to remain easy to maintain and which details matter most. WDC Services provides bathroom planning and installation, carrying the design consistently through the space. If laundry improvements or electrical work form part of a wider project, these can be planned alongside the renovation.
You don’t need every design decision settled before taking the next step. Sharing your priorities and preferred look can help shape a plan around your home. Contact WDC Services about your tiles and start planning a bathroom that feels considered, functional and distinctly yours.
Frequently Asked Questions
What Are the Best Bathroom Tile Ideas for Small Bathrooms?
Choose a simple overall scheme, then give one area a distinct purpose. A contrasting tile can mark the vanity zone while a related colour carries through the rest of the room. Consider sightlines from the doorway and avoid adding patterns to surfaces already divided by fittings or cabinetry. This helps each choice feel intentional and keeps the room’s main features easy to read.
Whether you’re starting fresh or freshening up, how do you choose the perfect bathroom tiles for your space?
Start with the bathroom’s fixed elements, such as cabinetry, tapware and the shower screen, then choose tiles that work with them. For a refresh, account for the finishes you’re keeping; for a full renovation, coordinate the palette across all surfaces. WDC Services undertakes bathroom renovations for homeowners across Kew East, Deepdene, Box Hill, Balwyn, Kew, Camberwell, Surry Hills, Vermont, Doncaster, Templestowe, Rosanna, Viewbank and Melbourne’s eastern suburbs.
How do you choose a tile pattern for a small bathroom?
Choose a pattern to suit the room’s strongest feature and how much attention you want it to attract. A single geometric panel can define a vanity, while a restrained layout across the remaining surfaces lets that detail stand out. Consider the view from the entrance and how the pattern meets niches, screens and cabinetry. A design that finishes neatly around these elements will feel more resolved.
Which bathroom tile patterns make a room look larger or taller?
Aligned horizontal lines can make a wall feel broader, while a vertical arrangement draws the eye upwards. Using a continuous colour across adjoining surfaces can also reduce visual breaks. Extending a similar tile tone from a shower wall onto a nearby return, for example, creates a more connected impression. These are visual effects, not changes to the room’s actual dimensions, so consider fixture and opening positions too.
What tile sizes and materials work best for custom bathroom patterns?
The best size and material depend on the pattern, surface and amount of detail in the room. Rectangular tiles suit directional layouts, while small-format pieces can form intricate motifs or fit confined areas. Compare samples with nearby finishes and consider how edges, corners and transitions will be completed. For a floor, select tiles rated for floor use; decorative appearance alone does not determine suitability.
How do you plan and set out a custom bathroom tile pattern?
Begin with a measured drawing that marks walls, openings, fixtures and planned feature areas. Choose a reference line, then map the pattern from that point across each surface. Check where the repeat meets corners, doorways and niches, adjusting the starting position to avoid awkward-looking cuts. Planning adjoining walls and floors together also helps the pattern feel connected rather than changing abruptly at transitions.
What tile wastage allowance is needed for complex bathroom patterns?
There isn’t one allowance that suits every pattern. The quantity depends on the room’s shape, tile dimensions, layout direction and number of cuts. A diagonal design or a room with several recesses can create more offcuts than a straightforward arrangement. Work from measured surface areas and the planned set-out, accounting for edges and detailed features. Keep suitable spare tiles from the same batch for future repairs.
What are the pros and cons of herringbone, chevron, basketweave and geometric patterns?
Herringbone adds directional movement, but its angled joins need careful set-out. Chevron creates a continuous point, though cuts at boundaries can affect its symmetry. Basketweave gives a structured, interlaced appearance, while geometric motifs can make a strong focal feature. Each pattern adds more visual definition than a plain grid, so consider how it relates to nearby finishes and whether the room needs a focal point or a quieter surface.
Disclaimer
Please note this advertisement has been AI generated for entertainment and leed generation purposes and In some cases may not reflect the companies exact services and information.
Prior to engaging the company it is recommended that you seek clarification on some or all points in this advertisement .
Wdc services has many 5 star google reviews that can be used as a reliable and true testimony to the quality services proved to its customers over many years.
Contact Domenico ( Dom ) Crupi on 0425801005 or email info@wdcservices .com.au
for further information
Disclaimer: Disclaimer, Please note this advertisement has been AI generated for entertainment and leed generation purposes and In some cases may not reflect the companies exact services and information. Prior to engaging the company it is recommended that you seek clarification on some or all points in this advertisement. WDC Services has many 5 star google reviews that can be used as a reliable and true testimony to the quality services proved to its customers over many years. Contact Domenico ( Dom ) Crupi on 0425801005 or email info@wdcservices .com.au for further information.