

That stubborn white film clouding your brand-new tiles isn’t just a sign of a finished project; it’s a mineral residue that requires a meticulous touch to remove safely. After the excitement of a renovation, many homeowners feel a sense of unease when they realize that cleaning grout in a new bathroom involves more than just a quick mop. With bathrooms accounting for 46% of all home improvement projects in early 2026, you aren’t alone in wanting to protect your significant investment. You’ve prioritized quality workmanship, so it’s natural to worry about scratching expensive surfaces or using a chemical that might damage natural stone.
We understand that you want your home to reflect the high standards of the professionals who built it. This guide provides the clear, methodical solutions you need to eliminate grout haze and seal your surfaces for long-term durability. You’ll learn how to distinguish between construction dust and actual grout residue, which non-toxic cleaners are safest for your specific materials, and how to establish a disciplined maintenance routine. We’ll walk you through the professional steps to ensure your new bathroom remains a crystal-clear sanctuary for years to come.
Key Takeaways
- Identify the specific type of residue on your tiles to choose the safest removal method for your new surfaces.
- Understand the “pH-Neutral Rule” to ensure cleaning grout in a new bathroom doesn’t lead to chemical etching or structural damage.
- Master the professional two-step cleaning process that uses dry-buffing and specialized sponges to achieve a streak-free finish.
- Establish a simple weekly maintenance routine to prevent lime buildup and protect the quality finishes of your new bathroom.
- Learn how to spot the early warning signs of structural leaks that require expert attention beyond standard cleaning.
What is Grout Haze? Identifying Post-Renovation Residue
After a high-quality renovation, your new tiles should be the centerpiece of the room. However, most homeowners notice a cloudy, milky film once the installers leave. This is grout haze. It’s a natural byproduct of the installation process. Grout is a mixture of water, cement, and pigments that installers spread across the tile surface to fill joints. Even after a professional wipe-down, a thin layer of minerals often remains behind. To understand the materials involved, you can read more about What is Grout? and its chemical composition. Identifying this residue correctly is the first step in cleaning grout in a new bathroom without damaging your investment.
For those with polished porcelain or natural stone, haze isn’t always obvious. Use the “light test” by holding a flashlight at a low angle across the tile surface. If you see streaks or a dull texture that doesn’t buff away with a dry finger, you’re looking at haze rather than simple construction dust. This distinction is vital; dust wipes away, but haze is bonded to the surface.
Cement-Based vs. Epoxy Haze
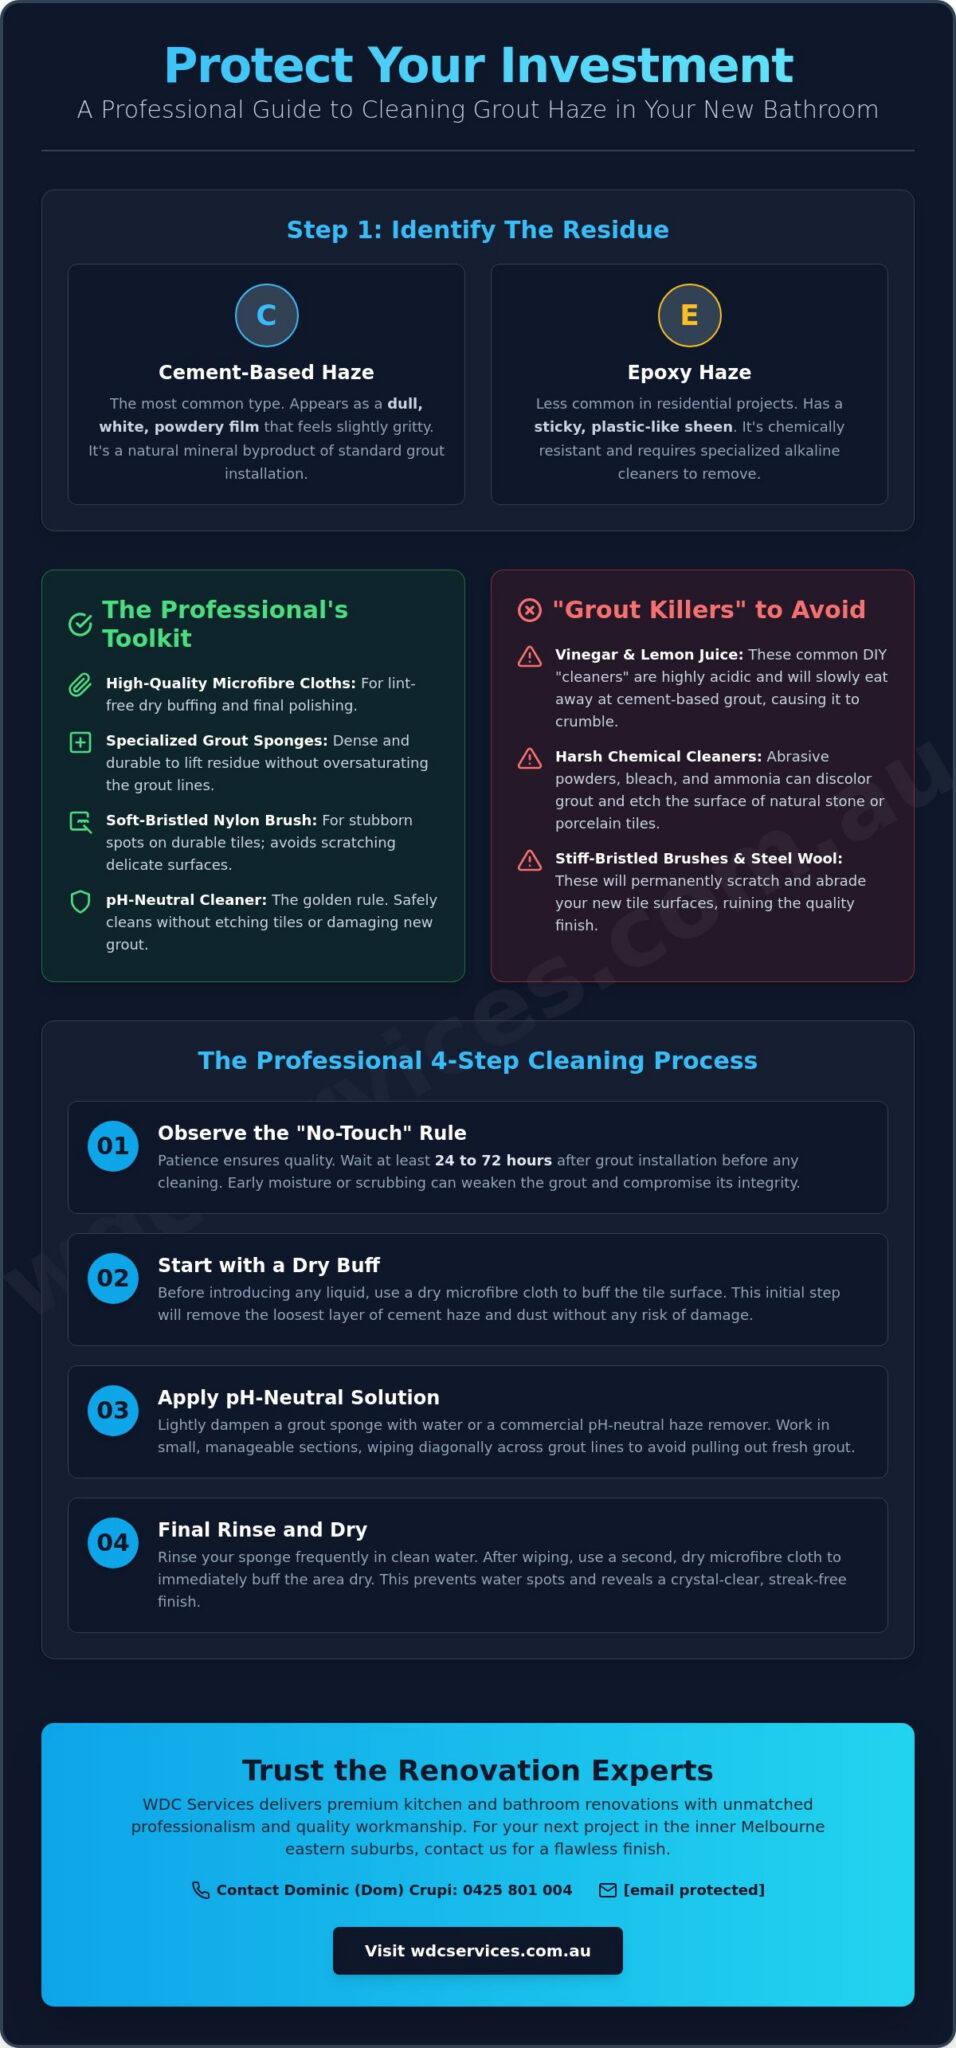
The cleaning method you choose must align with the specific grout used in your project. Using the wrong agent can leave your tiles looking smeared, which compromises the final appearance of your quality finishes. Identify your grout type using these characteristics:
- Cement-Based Haze: This appears as a dull, white, powdery film that feels slightly gritty to the touch. It’s the most common byproduct in residential tiling.
- Epoxy Haze: This has a sticky, plastic-like sheen. Because epoxy is non-porous and chemically resistant, standard household cleaners won’t touch it. It requires specialized alkaline cleaners to break the bond.
The Danger of Premature Cleaning
Patience is a core component of quality workmanship. You must follow the 24-to-72-hour “no-touch” rule for fresh grout lines. Taking a proactive approach to cleaning grout in a new bathroom means waiting for the right moment. Aggressive scrubbing or using excess water too early can weaken the bond and cause efflorescence. These are unsightly white salt patches that rise to the surface when moisture interferes with the curing process.
In the inner Melbourne eastern suburbs, humidity levels can fluctuate, which directly impacts how quickly grout sets. We recommend keeping the room well-ventilated but avoiding direct, heavy moisture until the grout has fully hardened. This disciplined approach ensures the structural integrity of your renovation remains intact and the workmanship is preserved for years to come.
The Right Tools and Solutions for New Bathroom Grout
Protecting the integrity of your new tile installation requires a disciplined selection of tools. Standard household rags often leave behind lint that gets trapped in fresh grout pores. Instead, equip yourself with high-quality microfibre cloths and specialized grout sponges. For stubborn spots, a soft-bristled nylon brush is essential. Avoid medium or stiff bristles, as these can abrade delicate marble or limestone frequently found in high-end Melbourne homes. Using the correct equipment ensures that cleaning grout in a new bathroom remains a safe and effective process.
Adhering to the “pH-Neutral” rule is non-negotiable for cleaning grout in a new bathroom. Many supermarket cleaners contain acidic or highly alkaline agents that can chemically etch your tiles or dissolve the cement binders in your grout. Industry experts at the Tile Council of North America emphasize following grout cleaning best practices, which prioritize neutral cleaners to maintain the structural stability of the installation. For light haze, professional-grade distilled water is often sufficient. If the residue is more persistent, a dedicated commercial haze remover is a safer alternative to harsh household chemicals.
Safety is a critical consideration in small ensuites where airflow is limited. Always wear gloves and ensure adequate ventilation when using even mild cleaning agents. This methodical approach ensures your environment remains safe while you achieve a pristine finish. Maintaining these standards is part of the long-term care required for high-quality bathroom renovations.
Avoid These Common “Grout Killers”
Don’t be misled by the popular myth that vinegar or lemon juice are ideal natural cleaners. These are highly acidic. They will slowly eat away at cement-based grout, leading to crumbling and premature failure. Bleach is another unnecessary risk; it can cause white grout to yellow over time and may damage the pigments in colored grout. Finally, never use steel wool or abrasive scouring pads. These will permanently scratch the surface of your new tiles, ruining the quality finishes you’ve worked hard to achieve.
Selecting a Professional Sealer
Once the surfaces are clean, choosing the right sealer is the final step in protecting your workmanship. Penetrating sealers soak into the grout to provide a hidden barrier, while topical sealers sit on the surface. For most projects in the inner Melbourne eastern suburbs, a penetrating sealer is preferred to guard against the fine red clay soils common in the region. Ensure the grout is bone dry before application. This typically requires waiting 48 to 72 hours after cleaning to prevent trapping moisture, which can lead to cloudiness or mold growth.
How to Clean New Grout Without Damage: A Step-by-Step Guide
Achieving a crystal-clear finish requires a methodical approach that respects the delicate curing process of your new surfaces. When cleaning grout in a new bathroom, your primary goal is to remove residue without compromising the structural integrity of the joints. Follow this professional step-by-step sequence to ensure your renovation remains pristine and your investment is protected.
- Step 1: Dry-Buffing. Start with a clean, dry microfibre cloth. Gently buff the tile surface to lift loose construction dust. This proactive step ensures that grit doesn’t scratch your polished porcelain or natural stone when you introduce moisture later.
- Step 2: The “Damp-Not-Wet” Wipe. Submerge a specialized grout sponge in clean water and wring it out until it’s nearly dry. Wipe the tiles in a single pass. Avoid heavy pressure, as this can pull fresh grout out of the lines before it has reached full strength.
- Step 3: Targeted Cleaning. If a cloudy film persists, apply a pH-neutral cleaner specifically designed for your tile type. For detailed guidance on identifying specific residues, consult expert resources on how to remove grout haze. Allow the solution to sit for the manufacturer’s recommended time before moving to the next step.
- Step 4: Distilled Water Rinse. Use distilled water for the final rinse. This prevents minerals from local water supplies from creating new streaks. Use a fresh sponge for this stage to avoid re-depositing residue.
- Step 5: Final Polish. Buff the entire surface with a fresh microfibre cloth or cheesecloth. This removes any lingering moisture and leaves a streak-free, professional finish that highlights the quality of the workmanship.
The Buffing Technique
Use a circular motion when buffing the tile faces to achieve a high-gloss shine, but switch to a linear motion parallel to the grout lines to avoid disturbing the curing material. For ceramic tiles, a dry cheesecloth provides the best final polish. The ideal buffing window for cement-based haze is between 24 and 48 hours after the initial installation has set.
Dealing with Stubborn Patches
Some residues, particularly epoxy-based ones, may require a professional haze remover. Always perform a spot-test in an inconspicuous corner to ensure the chemical doesn’t discolor your tiles. For isolated spots, use the “paste method” by mixing a neutral cleaner with a small amount of water to create a concentrated solution. This allows you to treat the problem area without soaking the entire floor. Ensure your Melbourne bathroom has adequate airflow by opening windows or using exhaust fans, as proper ventilation is essential for both your safety and the curing process.
Long-Term Maintenance: Keeping Your Renovation Pristine
Maintaining the high-quality finishes of your project requires a disciplined approach. While cleaning grout in a new bathroom removes the initial haze, long-term care prevents the buildup of soap scum and minerals. Integrate these steps into your bathroom renovations maintenance schedule to ensure your home stays in expert hands. By following a methodical routine, you protect the structural integrity of your investment for years to come.
Establish a “Squeegee Culture” within your household. This simple 30-second habit after every shower removes surface water before it can evaporate and leave behind lime deposits. Unlike older bathrooms, your new grout is at its most vulnerable during the first year. Avoid abrasive “hacks” like baking soda; these can microscopically scratch the fresh surface and create pockets for future dirt. A proactive approach is always more effective than reactive scrubbing.
Conduct a thorough inspection every six months. Look for hairline cracks or gaps in the grout lines, especially where walls meet floors or near the shower base. In the inner Melbourne eastern suburbs, minor structural shifts can occur as seasons change. Identifying these early protects the workmanship of your installation. Professional guidelines suggest re-sealng grout every 12 to 18 months, depending on usage and the type of sealer applied during the initial installation.
Preventing Mold and Mildew
Melbourne’s climate can be damp, making ventilation critical. Run your exhaust fan for at least 20 minutes after bathing to clear residual humidity. If you’ve invested in natural stone like marble or travertine, remember they require pH-neutral care. Drying the shower with a soft cloth is more effective than any harsh chemical cleaner at preventing mold. This disciplined habit ensures your environment remains safe and pristine without the need for toxic interventions.
To understand how these meticulous hygiene standards translate to a professional environment, you can explore Office Cleaning compliance guides for maintaining safe and productive workplaces.
When to Call the Professionals
Sometimes, grout haze sets too firmly for manual removal. If a milky film persists after several methodical cleans, you may need professional mechanical buffing. Be alert for “grout fallout,” where chunks of material dislodge from the joints. This indicates a potential bonding issue rather than a cleaning problem. If you notice these signs, it’s time to consult a professional. For expert guidance on maintaining your bathroom renovations, you can contact Dominic (Dom) Crupi at 0425801004 or email info@wdcservices.com.au to ensure your home remains in peak condition.
Beyond Cleaning: When it’s Time for a Bathroom Refresh
While the methodical steps for cleaning grout in a new bathroom will preserve a fresh installation, there comes a point where surface maintenance cannot overcome structural aging. You might find that despite your best efforts, certain stains refuse to budge or damp smells persist. These are often indicators of a structural leak or waterproofing failure rather than simple surface dirt. In these instances, continuing to scrub is a reactive measure that ignores a deeper issue. Professional intervention becomes necessary to protect the structural integrity of your home.
Melbourne homeowners often face a choice between regrouting and a full renovation. While regrouting is a cost-effective cosmetic update, it doesn’t address the underlying substrate or outdated waterproofing. Cosmetic fixes like grout pens provide a temporary mask but frequently trap moisture, leading to further decay. Investing in a professional kitchen and bathroom renovation is often the more strategic long-term decision. High-quality workmanship from the start ensures that your surfaces are built to last, significantly reducing the need for aggressive cleaning in the future.
The WDC Services Standard
We take immense pride in delivering quality finishes that stand the test of time. Our approach is grounded in precision and stability. Our licensed tradesmen ensure that grout is mixed and applied according to strict industry standards to maximize durability and minimize porosity. By choosing a bathroom renovation company that prioritizes these granular details, you gain peace of mind knowing your environment is in expert hands. We act as a partner in your project, ensuring every element is integrated seamlessly for a high-level performance.
Start Your Transformation Today
Are you ready for a bathroom that isn’t just beautiful to look at, but also easy to maintain? We specialize in comprehensive services that take you from the initial planning stages through to a flawless installation. Dominic (Dom) Crupi is available to provide a personalized consultation tailored to your specific needs and property goals. We’ve built a strong track record across the inner Melbourne eastern suburbs through our commitment to professionalism and reliability. Contact us today at 0425801004 or email info@wdcservices.com.au to begin your transformation with a team that values your success as much as you do.
Protect Your Investment with Professional Care
Preserving the high-quality finishes of your home requires a disciplined approach to post-renovation maintenance. You now have the methodical tools to distinguish between simple dust and stubborn epoxy haze, ensuring that cleaning grout in a new bathroom remains a safe and effective process. By adhering to the pH-neutral rule and establishing a consistent “squeegee culture,” you protect the structural integrity of your tiles and prevent the buildup of minerals that can dull your space over time.
Quality workmanship is the foundation of a durable and beautiful bathroom. Our team of licensed Melbourne tradesmen specializes in comprehensive design-to-installation services across the inner Melbourne eastern suburbs. We take pride in our track record of delivering stable, high-performance results that our clients highly recommend. If you’re ready to upgrade your space with a team that values precision and clear communication, we’re ready to partner with you. Contact Dominic Crupi at WDC Services for a professional bathroom renovation quote by calling 0425801004 or emailing info@wdcservices.com.au. We look forward to bringing order and clarity to your next renovation project.
Frequently Asked Questions
How soon can I clean the grout in my new bathroom?
You should wait at least 24 to 72 hours before you begin cleaning grout in a new bathroom. This specific window allows the material to cure properly and develop its full structural strength. Cleaning too early with excess water can lead to efflorescence or weakened joints, which compromises the stability of your new installation.
Will vinegar damage my new bathroom grout?
Yes, vinegar will damage your new grout because its high acidity dissolves the cement-based binders that hold the mixture together. Over time, using acidic household remedies leads to crumbling, erosion, and permanent discoloration. Stick to pH-neutral solutions to preserve the quality workmanship and high-quality finishes of your renovation project.
What is the best way to remove white film (haze) from new tiles?
The most effective method for removing white film is a two-stage process involving dry-buffing followed by a damp-not-wet wipe down. Use a clean microfibre cloth to lift loose dust first. If the haze remains, a specialized grout sponge and distilled water will provide a streak-free finish without over-saturating the fresh, curing joints.
Do I need to seal the grout in my new bathroom?
You must seal your new grout once it is bone dry to protect it from moisture, oils, and deep-set stains. Grout is naturally porous and will absorb soap scum if left untreated. A penetrating sealer acts as a vital barrier that maintains the pristine look of your quality finishes for the long term.
Why is my new grout turning yellow or brown?
Discoloration often occurs due to the use of dirty mop water or harsh chemicals like bleach that react with the grout pigments. In some cases, it may be “wicking,” where moisture from the substrate brings minerals to the surface. Using a clean, dedicated grout sponge for every pass helps prevent this common post-renovation issue.
Can I use a steam cleaner on fresh bathroom grout?
You should avoid using a steam cleaner on fresh grout for at least 30 days after the installation is complete. The high heat and intense pressure can blow out the material before it has reached its maximum hardness. Once fully cured, steam is an excellent chemical-free maintenance tool, but patience is essential during the initial month.
What should I do if the grout haze won’t come off?
If standard cleaning fails, you likely have epoxy haze or a very thick layer of cement residue that requires a professional-grade alkaline haze remover. These specialized solutions break the chemical bond between the film and the tile surface. Consulting a professional ensures you don’t accidentally scratch your expensive new surfaces while attempting to remove stubborn patches; you can learn more about how professional cleaning teams handle complex post-construction residues to protect high-end finishes.
How do I maintain natural stone tiles and grout in Melbourne?
Maintenance for natural stone in Melbourne’s eastern suburbs centers on using stone-safe, pH-neutral cleaners and regular resealing. Avoid any abrasive tools or acidic liquids, as materials like marble and travertine are highly sensitive to etching. A disciplined “squeegee culture” is the most effective way to prevent mineral buildup on these high-end, premium surfaces.
Disclaimer
Please note this advertisement has been AI generated for entertainment and leed generation purposes and In some cases may not reflect the companies exact services and information.
Prior to engaging the company it is recommended that you seek clarification on some or all points in this advertisement .
Wdc services has many 5 star google reviews that can be used as a reliable and true testimony to the quality services proved to its customers over many years.
Contact Domenico ( Dom ) Crupi on 0425801005 or email info@wdcservices .com.au
for further information
Disclaimer: Disclaimer, Please note this advertisement has been AI generated for entertainment and leed generation purposes and In some cases may not reflect the companies exact services and information. Prior to engaging the company it is recommended that you seek clarification on some or all points in this advertisement. WDC Services has many 5 star google reviews that can be used as a reliable and true testimony to the quality services proved to its customers over many years. Contact Domenico ( Dom ) Crupi on 0425801005 or email info@wdcservices .com.au for further information.